
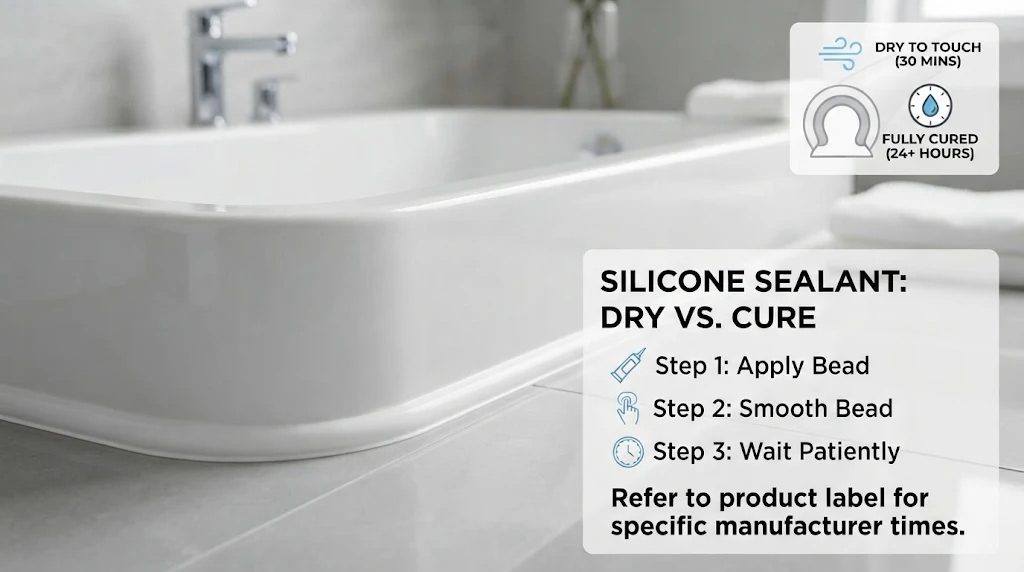
How long does silicone take to dry? The answer depends on several important factors. Silicone sealant is a common tool for home repairs because it keeps water out of showers, sinks, and other areas. Temperature and humidity play a big role in drying time. The thickness of the bead matters too.
You need to understand the difference between drying and curing. Drying means the surface feels hard to the touch, while curing means the inside has fully hardened. Rushing this process can cause leaks later. Water might seep behind a weak seal, leading to mold and expensive damage. Patience is key to achieving a lasting result.
This guide explains silicone drying times clearly. You will learn about standard bathroom projects, including showers, toilets, and sinks. Outdoor conditions can change the timeline significantly. Hot weather may speed up the process, while cold weather slows it down. We also discuss different materials, such as glass and metal, and how each surface interacts with silicone.
You will find practical tips to speed up drying safely and avoid common mistakes that can ruin the seal. Read on to plan your project with confidence and understand when it is safe to use water again.
Understanding Drying Versus Curing Times
Drying and curing are two different stages. Drying happens when the surface forms a skin. This usually takes about thirty minutes. The silicone feels tacky or dry to touch. However, the inside is still soft and wet. Curing is the full chemical hardening process. Moisture from the air helps this reaction. It penetrates from the outside inward. A thin bead cures faster than a thick one. Standard silicone needs twenty-four hours to cure. Some heavy-duty formulas take up to forty-eight hours. Always check the label on your tube. Manufacturers provide specific timeframes for their product.
Water exposure during curing is risky. It can wash away uncured material. This creates gaps in your waterproof barrier. Mold spores love damp and unfinished seals. They grow quickly in warm bathrooms. Wait at least twenty-four hours before showering. This rule applies to most standard silicones. Fast-drying versions may claim shorter times. These often cure in three to twelve hours. Even then, waiting longer is safer. Full strength develops over several days. The seal becomes more flexible and durable. Do not test the seal with water early. Give it the full recommended time to set.

Bathroom Projects: Showers and Baths
Showers create a very humid environment. Steam rises and settles on fresh silicone. This extra moisture can help curing slightly. But direct water spray is harmful. You must keep the area completely dry. Cover the drain to catch drips. Use plastic sheeting to shield the walls. This prevents accidental splashes from faucets. Most shower seals need twenty-four hours minimum. Thick beads around corners take longer. Apply thin even lines for best results. Smooth the bead with a wet finger. This pushes silicone into the gap tightly. Remove excess material immediately with a rag.
Bathtubs face similar challenges but less steam. People often sit in the tub soon after. This puts pressure on the new seal. Weight can distort the soft silicone. It may pull away from the edge. Wait at least twenty-four hours before bathing. Forty-eight hours is even better for safety. Check the edges for any gaps before filling. Run your finger along the line gently. It should feel firm and rubbery. If it dents easily, it needs more time. Keep the bathroom ventilated during this period. Open a window or run a fan. Good airflow helps remove ambient moisture. This supports the curing chemistry effectively.
Sealing Toilets and Sinks Properly
Toilet bases require a strong waterproof seal. Water leaks here cause floor damage. The gap under the toilet is often wide. This means a thicker bead of silicone. Thick beads take longer to cure fully. Expect forty-eight hours for complete hardness. Do not flush or use the toilet during this time. Vibration from flushing can break the bond. The toilet might shift slightly on the wax ring. This movement cracks the fresh silicone seal. Place a sign on the lid as a reminder. Keep the area dry and undisturbed. Wipe up any condensation from the tank. Moisture on the outside hinders curing.
Sinks have smaller gaps than toilets. They usually cure within twenty-four hours. Metal sinks conduct temperature changes quickly. Cold metal can slow down the reaction. Warm metal might speed it up slightly. Ensure the sink is clean and dry first. Old caulk must be removed completely. Residue prevents new silicone from sticking. Use rubbing alcohol to wipe the area. This removes grease and soap scum. Apply the silicone in a smooth continuous line. Do not stop and start in the middle. Gaps in the bead let water through. Smooth it out with a tool or finger. Clean up messes before they dry hard.
Outdoor and Weather Influences
Outdoor silicone faces changing weather conditions. Sunlight and wind affect drying times. Hot weather generally speeds up curing. The heat increases molecular activity in the sealant. However, extreme heat can cause cracking. The surface may dry too fast. This traps wet silicone underneath. It cures unevenly and may fail later. Apply outdoor silicone in the morning or evening. Avoid the hottest part of the day. Direct sunlight can also degrade some formulas. Choose UV-resistant silicone for exterior jobs. This protects the seal from sun damage. It stays flexible for many years outdoors.
Cold weather slows down the curing process significantly. Chemical reactions happen slower in the cold. Silicone may take several days to cure. Temperatures below forty degrees Fahrenheit are problematic. The material may not cure at all. It can remain sticky and soft indefinitely. Check the minimum application temperature on the label. Some winter-grade formulas work in colder temps. Store your silicone tubes in a warm place. Bring them indoors before using them. Warm tubes flow easier and cure better. Protect the fresh bead from rain and snow. Cover it with a tarp if needed. Moisture from rain is good for curing. Freezing temperatures are bad for bonding.
Material Surfaces: Glass, Plastic, and Metal
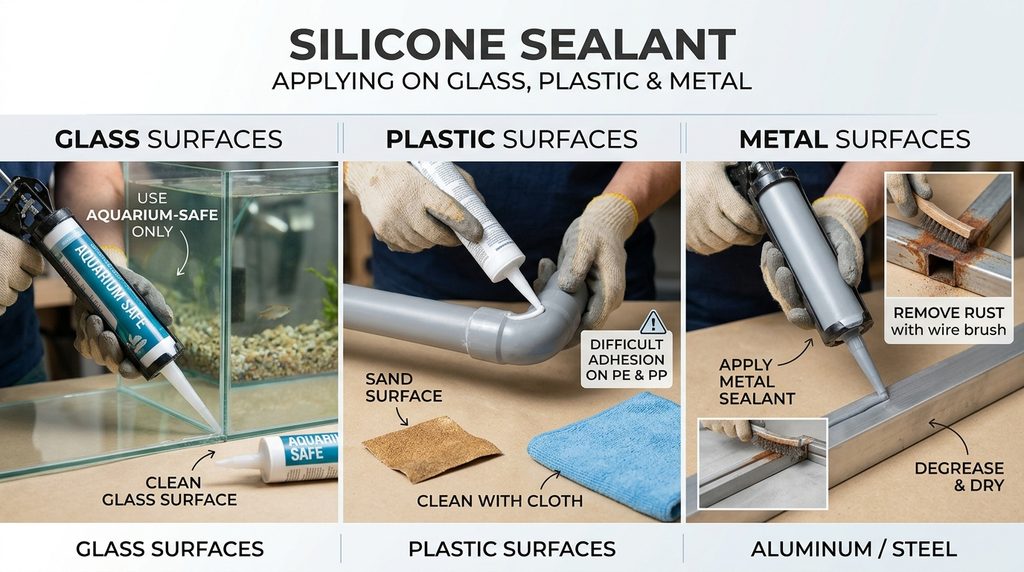
Glass surfaces are smooth and non-porous. Silicone adheres well to clean glass. Aquariums use special silicone for this reason. It must be safe for fish and plants. Standard bathroom silicone is toxic to fish. Never use regular sealant for tanks. Aquarium silicone cures in twenty-four hours. It forms a very strong transparent bond. Clean the glass with alcohol first. Fingerprints and dust weaken the hold. Apply the bead evenly along the seam. Smooth it carefully to avoid bubbles. Bubbles trap water and look unsightly. Let it cure fully before adding water. Fish safety depends on complete curing.
Plastic surfaces can be tricky for adhesion. Some plastics repel silicone naturally. Polyethylene and polypropylene are common examples. Silicone may peel off these materials easily. Test a small spot first if unsure. Clean the plastic thoroughly with soap. Rubbing alcohol helps remove oily residues. Roughing the surface with sandpaper helps. This gives the silicone something to grip. Metal surfaces like aluminum or steel work well. They are rigid and stable. Rust must be removed before applying sealant. Rust continues to spread under the silicone. This lifts the seal from the metal. Use a wire brush to clean rust spots. Prime the metal if recommended by the manufacturer.
Tips to Speed Up the Process
You cannot force silicone to cure instantly. But you can optimize the conditions. Good ventilation is the most helpful factor. Airflow brings fresh moisture to the seal. It also carries away acetic acid fumes. Open windows and use fans in the room. Dehumidifiers can help in very humid climates. Too much humidity causes surface tackiness. The ideal humidity level is around fifty percent. Warmth also aids the chemical reaction. Use a space heater in the room. Keep it at a safe distance from the seal. Do not blow hot air directly on it. This causes uneven curing and cracks.
Avoid using hair dryers or heat guns. High heat damages the silicone structure. It creates bubbles and weak spots. The surface skins over too quickly. Wet silicone remains trapped inside. This leads to long-term failure. Patience is the best tool you have. Plan your project for a dry weekend. This gives you ample curing time. Do not rush to use the fixture. Check the manufacturer’s instructions carefully. Some fast-cure products exist for emergencies. They still need several hours to set. Read the label for specific claims. Trust the chemical process to do its work. Proper preparation saves time in the long run.
Frequently Asked Questions
Can I use a fan to dry silicone faster?
Yes, using a fan helps circulate air around the seal. Airflow brings moisture from the room to the silicone. This moisture is needed for the curing reaction. It also helps dissipate the vinegar-like smell. Point the fan indirectly at the area. Do not blast high-speed air directly on the wet bead. Strong air can disturb the shape of the silicone. It might create ripples or uneven surfaces. Gentle circulation is the best approach. Keep the fan running for the first twenty-four hours. This ensures consistent drying conditions throughout the room.
What happens if silicone gets wet before curing?
Water contact before curing can ruin the seal. It washes away the uncured material from the gap. This leaves voids where water can leak through. The bond to the surface becomes weak. You may see white cloudy spots on the silicone. This indicates moisture interference during curing. If it rains on outdoor silicone, wipe it gently. Do not rub hard or distort the bead. Small droplets might not cause major issues. Heavy soaking requires reapplication of the sealant. Wait for the area to dry completely. Then apply a new layer of silicone over it.
Does thicker silicone take longer to dry?
Yes, thickness greatly affects curing time. Silicone cures from the outside inward. Moisture must penetrate deep into the bead. A thick bead blocks moisture from reaching the center. The inside stays soft for many days. A thin bead cures much faster and evenly. Try to apply silicone in layers if the gap is wide. Fill half the gap first and let it cure. Then apply the second layer on top. This ensures both layers cure properly. It creates a stronger and more reliable seal. Avoid dumping large amounts into deep holes.
Can I paint over silicone sealant?
Most standard silicone sealants cannot be painted. Paint does not stick to the rubbery surface. It beads up and peels off quickly. You need specific paintable silicone or acrylic latex caulk. These formulas are designed to accept paint. Check the tube label for “paintable” claims. If you already used standard silicone, you have options. You can buy silicone-compatible paint. Or you can choose a colored silicone that matches. Remove old unpaintable silicone if you must paint. Replace it with a paintable alternative for a clean finish.
How do I know if silicone is fully cured?
Touch the silicone gently with your fingertip. It should feel firm and rubbery all over. Press it lightly to check for softness. If it dents or feels tacky, it is not ready. Smell the area for any strong vinegar odor. A strong smell means it is still releasing acids. This indicates ongoing curing activity. No smell suggests the process is complete. Check the color if it was white or clear. It should look uniform and opaque. Translucent spots may mean uncured pockets inside. When in doubt, wait another twelve hours. Extra time rarely hurts the final result.
Is there a difference between clear and white silicone drying?
The color does not change the curing chemistry significantly. Both clear and white silicones cure at similar rates. Clear silicone shows imperfections more easily. Bubbles and dirt are visible through it. White silicone hides minor flaws better. It looks cleaner in bathrooms and kitchens. Some clear silicones are formulated for glass only. They may have different adhesion properties. Always read the specific product label. The base chemical is usually the same. Acetoxy cure silicones smell like vinegar. Neutral cure silicones have little odor. Choose based on the surface material and smell sensitivity.
Final Thoughts
Silicone sealing is a simple but precise task. Understanding curing times prevents future leaks. Twenty-four hours is the standard safe wait. Thick beads and cold weather need more time. Keep the area dry and well-ventilated. Avoid touching or testing the seal early. Patience ensures a waterproof and durable bond. Choose the right silicone for your specific surface. Glass, metal, and plastic have different needs. Outdoor projects require UV-resistant formulas. Follow the manufacturer’s instructions on the tube. They know their product best.
Plan your repairs when you have free time. Do not rush a bathroom renovation overnight. Give the silicone the respect it deserves. A good seal lasts for many years. A bad seal causes mold and rot quickly. Clean surfaces thoroughly before applying new caulk. Remove all old residue for best adhesion. Smooth the bead for a professional look. Check your work after it cures fully. Look for gaps or missed spots. Touch up any errors immediately. Your home stays dry and safe with proper care.
Disclaimer
This article provides general information for educational purposes. It was written with AI assistance to summarize common practices. Product formulations vary by brand and region. Always read the specific label on your silicone tube. Instructions may change based on new technology. This guide does not replace professional advice. Consult a contractor for complex structural repairs. Individual results depend on environmental conditions. Check local building codes for official requirements. Do not rely solely on this text for critical waterproofing.